How to add and view your 360 virtual tour in Oculus Quest
Unarguably VR headsets give viewers a more incredible and immersive experience that flat screens can’t compare. Many clients were always asking us how they could add and present their 360 virtual tours/ projects using Oculus Quest without a hitch.
With the introduction of the new 3DVista VR App for Oculus, there is nothing easier. The app is free to download form the Oculus Store. We no longer need to copy and paste tour links and view them through the browser, or download them from the online version. Instead, we can copy and play the tours directly in the device.
Just follow the 3 simple steps outlined below, you will be able to add and view your 360 virtual tour in Oculus Quest/ Quest 2:
Step 1: Publish your tour with the ‘For Web/ Mobile’ option
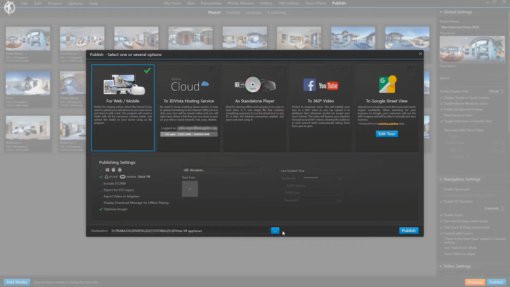
The first thing you have to do is to access and publish your tour in 3DVista VT Pro. Go to the ‘Publish’ section, click on the ‘For Web/ Mobile’ option. Then check the ‘Vive, Oculus and Gear VR’ box under the publishing settings. This selection will optimize the files for playback on VR devices. And optionally check the ‘Optimize Images’ box. This will help reduce the output file size. After everything is set, select a folder on your hard drive to which you want to save the tour and click ‘Publish’.
Important: Make sure you publish your tours with the most update version of 3DVista.
Step 2: Connect the Oculus device to your computer, create a new folder called ‘3dvista’ and copy the tour folder(s) into it.
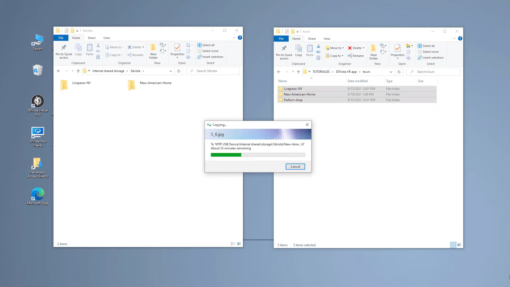
Switch on your Oculus device and connect it to your PC. This will pop up a menu on the Oculus screen prompting you to give your PC access to the device.
Go to the root folder of the Oculus drive and create a new folder with the name ‘3dvista’. It is where you will copy the previously published tour folder(s) into so that you can later view them with the 3DVista app.
Step 3: Install the 3DVista VR app into your Oculus


Access the Oculus App Store, search for the app ‘3DVista VR’ and install it. Initially, the app is not shown like some other apps in the top section. Instead, you will have to go to the underneath ‘App Lab’ section and click on the ‘view app’ button. This will make it appear in the list. If, however, this section does not appear, you need to check the device software version of your Oculus and make sure it is up-to-date.
To install the app, select 3DVista VR from the list and click the ‘+’ button to start the process. Once the download is finished, the ‘start’ button will appear. Click on the ‘start’ button to launch the app. Now the app will ask for permissions to access the contents of the device, hit ‘allow’ to continue.
All tours copied will be shown and accessible inside the app.

And that’s it. After the initial loading screen, the app will show you the list of all the tours that you have copied into the device. And by clicking on any one of them you can view them directly in VR mode.This is how you can add and watch virtual tours in Oculus Quest/ Quest 2. Enjoy!
O4B
If you are using O4B your administrator can download the app through this link: https://download.3dvista.com/vrapp/vrapp-3dvista-oculus.apk
Oculus Go
Unfortunately, this will not work natively on Oculus Go as this device does not support Oculus Apps Lab.
Other related topics that you may be interested:
- Our New Suite of 360 Virtual Tour Services
- Marketing Your Business with 360 Virtual Tour
- Why do we choose (and stick to) 3DVista for our 360 Virtual Tour Projects?
Drop us a line!
Contact us and let us help you create the most amazing 360 virtual tours!
Email: [email protected]
WhatsApp: +852 6099 4407